

-
Give your shelf the strongest start possible with our Heavy-Duty Fixings Upgrade Pack.
Welds & Wood supply wall fixings as part of selected fixing packs to assist with installation.EACH PACK ORDERED INCLUDES 6 ANCHORS.
These fixings are sourced from reputable fixing manufacturers and are commonly used for residential wall applications when installed correctly into brick, concrete or hollow timber and steel framed walls.
CHOOSE FROM EITHER:
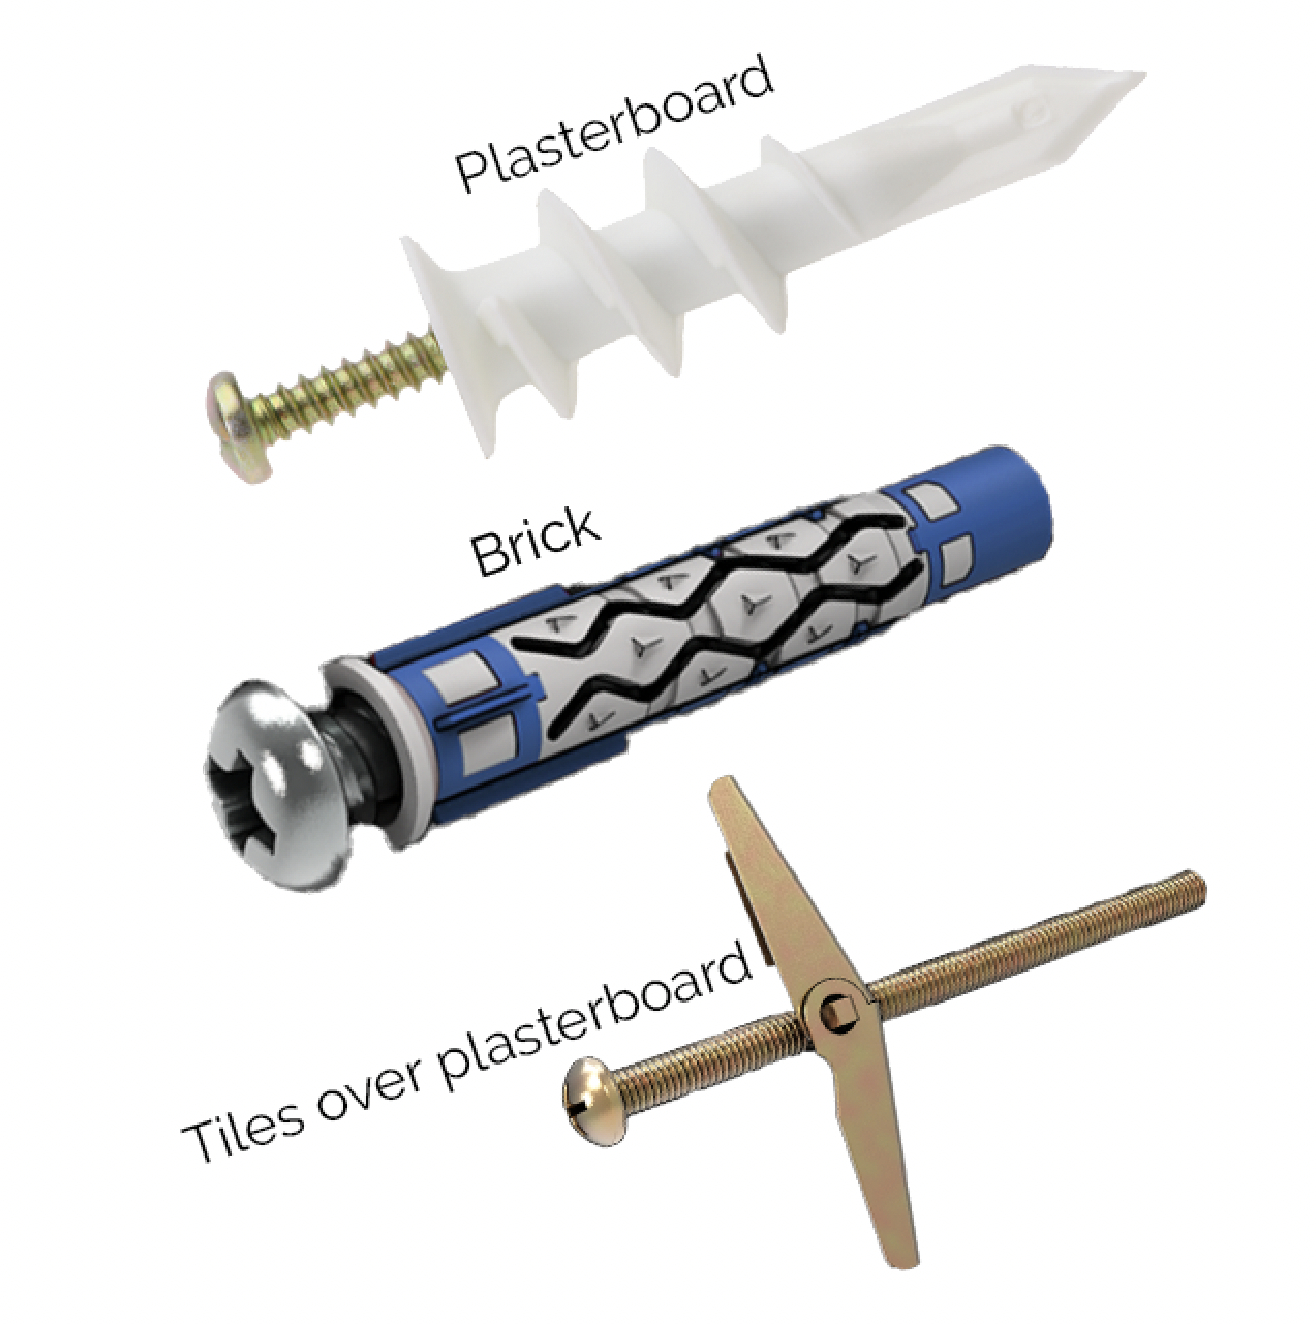
BRICK WALLS = 6 × 8mm Universal Anchors. Used for anchoring in concrete, stone, solid brick and solid block.
PLASTERBOARD WALLS = 6 x Plasterboard plugs. Quick and easy to install with nothing but a #2 Phillips Head screwdriver. Anchor for Gyprock / Plasterboard Walls.
STEEL FRAMED WALLS = 6 × Self Tapping screws, designed to anchor your product into steel framed studs
TILES OVER PLASTERBOARD WALLS = 6 × Spring Toggle Bolt, designed to anchor your product into hollow framed walls
This pack is an optional upgrade and is not part of the standard hardware kit supplied with our shelves.
Perfect for anyone who wants stronger fixings, additional load capacity, or peace of mind during installation.
Please research if these are suitable for your intended purpose.
-
Installing Plasterboard Anchors (Gyprock Only)
Use when: You cannot hit a stud
Tools Needed:
Philips screwdriver or drill
6mm drill bit (optional depending on wall hardness)
Steps:
Mark your hole location.
If your gyprock is hard/dense, pre-drill a 6mm pilot hole. Otherwise, screw the plug straight into the plasterboard.
Drive the plug clockwise until the wide flange sits flush against the wall. Do not overtighten.
Place your bracket over the anchor.
Insert the supplied screw and tighten firmly, but don’t crush the plasterboard.
Load Notes: RATED UP TO 15KG’S PER ANCHOR
Rated for light–medium loads when used correctly.
Floating shelves should never rely solely on hollow-wall anchors for structural support.
-
Installing Universal Anchors (Brick, Block or Concrete)
Use when: Your wall is solid masonry (brick, concrete, block).
Tools Needed:
Hammer drill
8mm masonry drill bit
Vacuum or blower
Screwdriver/drill
Steps:
Mark your hole position.
Drill an 8mm hole, to a depth of at least 50–60mm.
Clear the dust from the hole using a vacuum or blowing into it. Dust left in the hole reduces grip dramatically.
Push the universal anchor into the hole until flush.
Line up your bracket and insert the 8g × 50mm screw.
Tighten the screw until secure — you should feel the anchor expand inside the brick.
Load Notes: RATED UP TO 32KG’S PER ANCHOR
Excellent for floating shelf loads.
Best results are in face brick, not mortar.
Avoid drilling into corners or brick edges
-
Installing Self-Tapping Wafer Head Screws Into Steel Studs
Use when: You’re mounting into a steel stud wall (typical modern construction).
Tools Needed:
Stud finder (magnetic recommended)
Drill/driver with PH2 or appropriate bit
Steps:
Use a stud finder to locate the steel stud behind the gyprock.
Mark your screw locations along the stud centre.
Place the bracket on the wall and line it up with your marks.
Using a drill/driver, drive the wafer head self-tapping screw straight through the gyprock and into the steel stud. No pilot hole required.
Continue driving until the screw bites and tightens firmly against the steel stud.
Load Notes: RATED UP TO 10KG’S PER SCREW (Thickness of steel stud can alter rating)
Screws must hit the stud dead centre for maximum strength.
These screws provide strong support when used correctly.
For a floating shelf bracket, aim for minimum 2–4 screws into studs.
-
Installing Spring Toggle Bolts (Tiled Plasterboard Walls)
Use when:
Your wall is tiled with plasterboard behind it (no stud or solid masonry available).Important:
Toggle bolts rely on the plasterboard, not the tile. The tile only acts as a surface layer.Tools Needed:
Variable-speed drill
Tile or glass drill bit (typically 10–12 mm, size depends on toggle)
Standard drill bit (same size as tile hole, if required)
Masking tape
Screwdriver or drill
Vacuum
Steps:
Mark your hole position
Use masking tape over the tile to prevent the drill bit from wandering and to reduce chipping.Drill through the tile
Use a tile/glass drill bit.
Drill slow speed, no hammer function.
Apply light pressure and let the bit do the work.
Drill through the plasterboard
Once through the tile, continue through the plasterboard so the hole is large enough for the folded toggle to pass through.Insert the toggle bolt
Thread the toggle onto the bolt.
Fold the wings and push them through the hole until they open behind the plasterboard.
Pull tight and secure
Pull the bolt back toward you so the wings sit firmly against the back of the plasterboard, then tighten until snug.
Do not overtighten — this can crush the plasterboard and weaken the fixing.Mount the bracket
Align the bracket and fully tighten the bolt until secure.
Load Notes: RATED UP TO 10KG’S PER ANCHOR
Very strong fixing when installed correctly.
Load capacity depends on plasterboard condition and thickness.
Always use multiple fixings for shelves — never rely on a single toggle.
Avoid cracked tiles, tile edges, or grout lines.
Not suitable for crumbly or water-damaged plasterboard.
-
Fixings are supplied as a convenience only.
Customers are responsible for ensuring suitability for their wall type and intended load.
If you are unsure, seek advice from a qualified installer or carpenter.
Welds and Wood accept no responsibility for failed installs. It is entirely up to the installer to choose a fixing method that is correct for their intended situation.
Welds and Wood take no responsibility for failed installations or incorrect use.
Wall construction types, material strength and installation quality vary between properties.
It is the installer’s responsibility to ensure:
The correct fixing is selected for the wall type
The wall structure is suitable for the intended load
Installation is completed correctly and safely